Warlord Ruin is the Dungeon added in Season of the Wish. Its a great Dungeon, that gives off Dark Souls vibes – storming a castle, secrets and traps, plus some decent mechanics, but overall it’s not too difficult, meaning it should be good for beginners and veterans alike. Today I’m going to go through all the encounters, puzzles, and boss mechanics, plus I’ll check out the loot table, and give an overview of all the weapons for Warlords Ruin Dungeon in Destiny 2.
You can find the Dungeon on the EDZ, and you’ll need the dungeon key to access the Dungeon. This was part of the Lightfall Deluxe Edition or you can pick up the Dungeon keys separately. It’s possible to solo the Dungeon, although you’ll probably want to go in with a fireteam of 3 the first few times to learn the mechanics. Once you’ve got it down and understand how everything works, then it’s a good challenge to go back in solo.
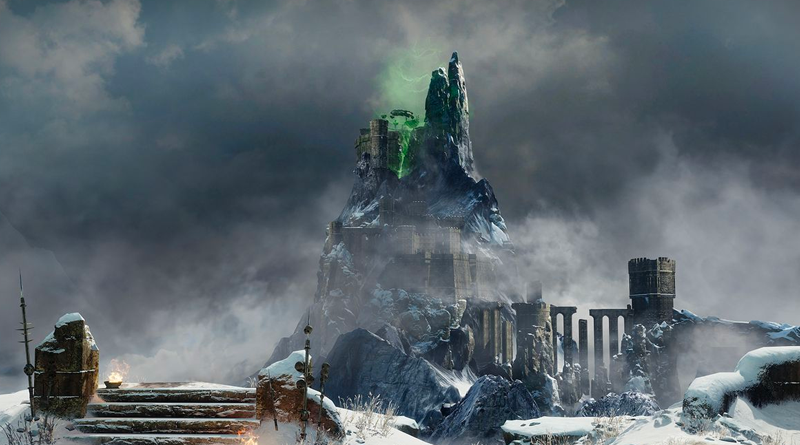
When you enter the Dungeon, you’ll want to climb the mountain and make your way around the ledges to the entrance. There are flags indicating which way you should go, and you want to follow them up and round to help you get to the castle entrance. Be careful for the chest that glows. It’s a trap and if you open it, then you’ll die… this is a repeating mechanic throughout the Dungeon.
Eventually you’ll find a bridge that connects the mountain to the castle, cross the bridge, kill the scorn and then enter the castle. Work your way through the halls, and then it’s time for the first encounter.
Rathil, First Broken Knight Of Fikrul
This is a good opening encounter that teaches you some of the dungeon mechanics. You’ll need to cleanse some Taken totems to remove the bosses shield. Adds spawn in and you’ll want to clear out as many as you can. Rathil then raises his arms and your team gets teleported into raised cells. You’ll then want to shoot 3 Taken Blighted Eyes near your cell to open the door. If you don’t do this in time, then you’ll die. Open up the door, jump out and make your way back to the taken totems.
The Imminent Wish timer counts down and this gives you the amount of time to cleanse. To cleanse, stand near the totems for a few seconds and try to cleanse as many as possible. When Imminent Wish has finished, then you’ll see the Naeem’s Wish Empowerment buff, and this is your DPS phase. At this point you want to unload as much ammo into the boss as possible. Repeat this process until you have removed the bosses health, and that’s the first encounter complete.
Imprisoned Puzzle
You’ll immediately get teleported into jail, and this is where many teams got stuck on the first run. To get out of jail you’ll have to turn 6 cogs clockwise and counter clockwise. You can turn them by shooting them. Shoot them once to start them turning clockwise, shoot again to stop, shoot again to turn them counter clockwise. You’ll have to communicate with your team to locate all 6.
Have a look around your cell and you’ll find a tally. These tally marks indicate how many cogs must rotate clockwise, with the remaining cogs rotating counterclockwise. Once you have the cogs turning in the right directions according to the tallys, then shoot the lock outside the door and all doors will open, allowing you to grab your loot from the first encounter.
Maze
Now you’ve made it out of jail, you’ll want to make your way through a maze. Defeat the Scorn and Taken and drop through a hole. Watch out for the exploding chests as they will bait you into opening them, but beware, they are traps. Be careful for the spikes in the walls and floors. It’s a bit of a maze, this area but eventually you’ll find your way through to a snowy area, which means you have made it through to the end of the maze section.
Make your way up and out, then start climbing up to the main castle. You’ll find yourself on a bridge and kill the scorn that appear, plus Hefnd’s Vengeance. You can’t damage Hefnd’s Vengeance at the moment so just avoid their attacks and make your way across the bridge towards the keep. You can’t go in the front door, so go up around the side and in through the hole in the wall.
Locus of Wailing Grief
Next you’ll find the second boss. The idea here is to ignite the four pillars in the middle to start the damage phase, and then rotate your team through the pillars damaging the boss as you go.
When you first start the encounter you’ll want to destroy the Blighted Eyes. Try to stay near the left or the right side when you defeat them, as the torches are going to help save you from the cold.
Two Broken Knights are going to spawn, one on the left and one on the right side. Totems will spawn and a blizzard starts. Kill the broken knights and stand near the totems to cleanse, and to stop freezing to death run and get near a torch. Each totem you cleanse will spawn a solar orb near where we started the encounter and ideally you want to spawn 4 solar orbs, then take the orbs to the four pillars in the middle, being careful to avoid the orge. It may not be possible to get all 4 orbs to spawn at the same time, so repeat the process of killing Scorn and grabbing the solar orbs if neccessary.
Once all the pillars have been ignited then it’s time for boss damage. The ogre is going to be walking towards the pillars and he’ll slam down on them to extinguish the flames, meaning you have to rotate to the next one. While the Orge is walking towards the pillar you want to be unloading as much ammo into the ogre as possible to take down his health. Repeat this process as many times as you need to defeat the boss.
Scale the castle
Now you have defeated Locus of Wailing Grief, you’ll want to make your way up. Follow the halls and make your way through the caves, killing the scorn and taken as you go. You’ll find the core of the mountain with a huge blight in there. Jump up and around the right wall and keep your eye on the snipers as they are tricky. Keep going up through a series of jumping puzzles and you’ll make your way to the final boss.
Hefnd’s Vengeance, Blighted Chimera
To start this encounter shoot the blight near the Ahamkara bones. Hefn’d Vengeance is then going to spawn and unleash a whole load of taken at you. Shoot the eyes next to the boss, and make sure you’ve taken out as many of the adds as possible.
The Broken Knights are back, and they spawn on either side of the encounter. After they spawn you’ll get hit with the Hex of Vengeful Corruption. To get rid of this you’ll want to melee the Corrupted Hex Drinker who spawn in, but be careful as they’ll try and hit you back, so once you melee them, get out of the way of these guys otherwise you’ll have the Hex returned to you with no time left, and you’ll die.
The rest of the encounter is similar to the last one. Kill the Broken Knights, cleanse the Taken Totems that spawn. Once the Imminent Wish counts down to 0, you’ll get a short window of damage on the boss, plus a nice audio cue that sounds like a sword clash. The damage phase is broken up into segments, where you have to ascend the moutain. The boss is at it’s most vulnerable at the top.
The first 3 sections of the boss encounter are fairly lengthy, you’ll be killing taken, avoiding the Hex of Vengeful Corruption, and taking down the Broken Knights. Once you get past the 3rd phase, you’ll jump onto platforms where you can deal the most damage to Hefnd’s Vengeance. The boss will grow a bunch of eyes, and you will want to focus as much damage onto the boss. Watch out for the platforms as they become corrupted, and then simply jump to the next platform. Repeat this process a few times, and you’ll get to the Final Stand.
At this point you’ll get teleported to the top of the ruins and you and your team have to pump as much damage into the boss as possible and take them out. Linear Fusions and rockets are all good for this section. Defeat the boss and that’s it, Warlord’s Ruin dungeon is complete.
Warlord’s Ruin Loot Table
First Encounter: Rathil
Dragoncult Sickle (Strand Sword)
Vengeful Whisper (Strand Bow)
Indebted Kindness (Special Rocket Sidearm)
Dark Age Mask (Helmet)
Dark Age Fists (Arms)
Dark Age Strides (Legs)
Second Encounter: Locus of Wailing Grief
Neem’s Lance (Strand Sniper)
Vengeful Whisper (Strand Bow)
Indebted Kindness (Special Rocket Sidearm)
Dark Age Fists (Arms)
Dark Age Harness (Chest)
Dark Age Class Item
Third Encounter: Hefn’s Vengeance
Buried Bloodline (Exotic Void Sidearm)
Dragoncult Sickle (Strand Sword)
Indebted Kindness (Special Rocket Sidearm)
Neem’s Lance (Strand Sniper)
All Armor Pieces
Indebted Kindness (Sidearm)
This one is a new archetype of weapon, a sidearm that fires rockets. It’s pretty unique, and probably has more of a place in PVE than PVP. For PVE Quick Launch, High-Velocity Rounds, Impulse Amplifier, Voltshot and Velocity masterwork would be good. For PVP Quick Launch, High-Velocity Rounds, Impulse Amplifier, Adagio, and Velocity masterwork.
Dragoncult Sickle (Sword)
This is a Strand Caster-frame sword, and it’s going to work well for strand builds. For PVE Honed Edge, Swordmaster’s Guard, Tireless Blade, and Surrounded would be good. For PVP Honed Edge, Burst Guard, Tireless Blade and En Garde would be good.
Neem’s Lance (Sniper)
This is a Strand Sniper, in the rapid-fire frame type. For PVE Fluted Barrel, Appended Mag, Reconstruction and Precision Instrument would be good. For PVP Fluted Barrel, Ricochet Rounds, Keep Away and Demolitionist would be good.
Vengeful Whisper (Bow)
This one is a Strand Bow, which is slightly surprising given later in the season we’re getting an Exotic Strand Bow, but this one could be a good subtitute if you want to take a legendary bow into your Strand builds. For PVE Elastic String, Fiberglass Arrow Shaft, Explosive Head and Precision Instrument. For PVP Flexible String, Fiberglass Arrow Shaft, Archer’s Tempo and Successful Warmup
Buried Bloodline (Exotic Sidearm)
I haven’t got the new Buried Bloodline Exotic Sidearm just yet, but it looks like a crossbow. For the exotic perks we have
- Hungering Quarrel – Fires two tracking bolts that leech health from the target
- Violent Reanimation – Rapid final blows with this weapon grant Devour to the wielder
It’s a random drop from the final boss, plus you can complete triumphs related to the dungeon to increase your chances, just find the ones with the little exotic engram next to triumphs, complete that and you’ll increase your drop rate chances.
Let me know in the comments what you think of the Warlord’s Ruin dungeon, and the loot, I’d love to hear what you think.